Winter has a way of exposing whatever your roof does poorly. If heat escapes through the attic or the roofline traps melting snow, an ice dam forms at the eaves, water backs up behind the ridge of ice, and the next thing you notice is a brown stain spreading across your ceiling. People often call after the third bucket is already half full. The good news is that a well executed plan can stop the leak, clear the roof, and lay groundwork so the problem does not return.
I have spent enough seasons on snow-laden roofs to appreciate how small decisions affect big outcomes. Ice dams aren’t a mystery once you’ve seen them up close. They are predictable, and more importantly, manageable with the right mix of urgent action and longer-term fixes.
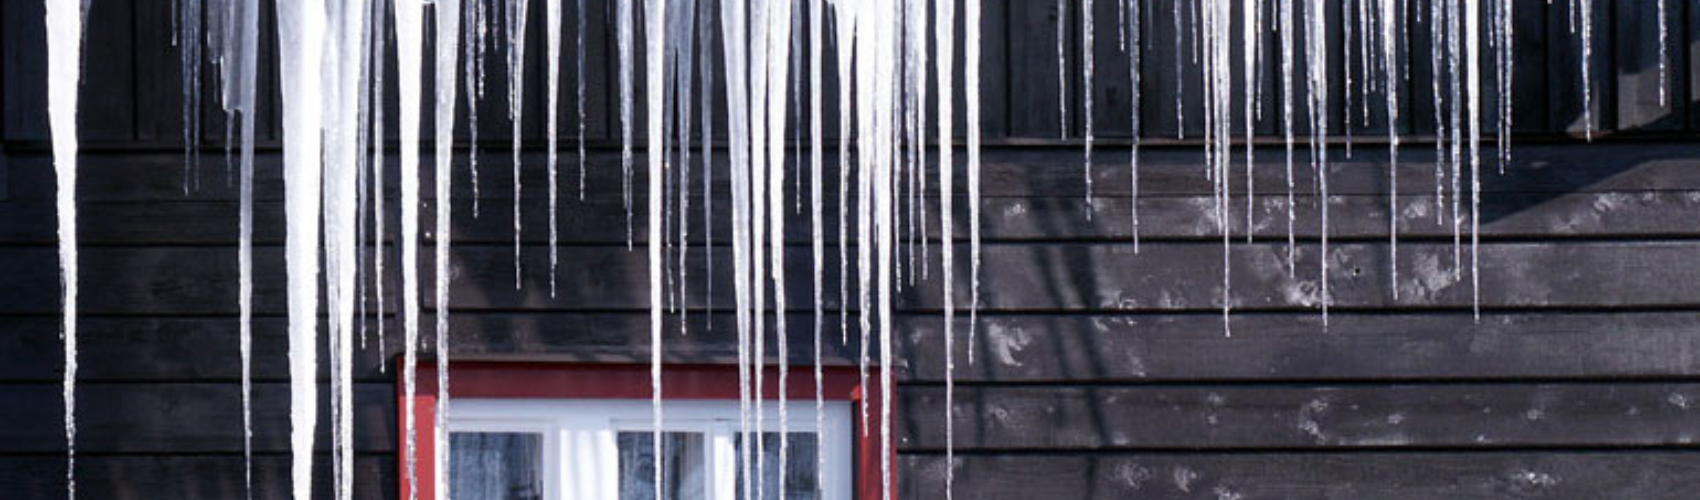
What an Ice Dam Really Is
An ice dam is a ridge of ice that forms along the lower edge of the roof, often at the gutters or overhangs. Warm air from the house melts snow higher up the roof, the meltwater runs down to the cold eave, refreezes, and builds a barrier. More water collects behind this icy lip and creeps under shingles, then into the sheathing and down into the living space. The leak you see is usually several feet away from where the water actually entered.
Heavy snowfall followed by daytime thaw and nighttime deep freeze creates ideal conditions. A south-facing roof can develop ice dams even in moderate cold if it catches strong sun, melts snow at mid-roof, then refreezes the runoff at the edge when the sun drops. Valleys, dormers, and areas above skylights collect more snow and often show the first trouble. On low-slope roofs, the risk rises because water moves slowly, giving it time to find a path under overlapping materials.
Understanding this cycle helps you decide how to respond. If you only remove the visible ice but do nothing about heat loss, the dam will come back with the next melt. If you rush to chip away the ice with a shovel, you’ll probably damage shingles and void the roof warranty. The right approach balances urgency with restraint.
Why Professional Ice Dam Removal Works
Homeowners are resourceful. I have watched people with pant legs packed in duct tape go up ladders with garden hoses, mallets, and bags of rock salt. They mean well, and sometimes they even break channels in the ice. Most of the time, though, they create new problems. Salt stains siding and kills shrubs. Hammers break shingles and loosen nails. Hot water in subzero weather turns into a glaze of black ice on steps and driveways.
Professional ice dam removal uses controlled heat, not brute force. The current standard is steam ice dam removal because saturated steam delivers heat that softens and slices the ice without overheating shingles or flashing. A trained technician can clear a 40 to 60 foot eave run in a couple of hours, depending on thickness and access. Work proceeds methodically, starting with safe pathways on the roof and ending with clear downspouts so the next melt has somewhere to go.
A credible ice dam removal service brings more than a steamer. They manage site safety, protect landscaping, account for where the meltwater will flow, and prevent icicles from falling onto walkways. They also understand when to switch tactics. Not every roof can support a crew during heavy snow loads. Not every home has adequate power for a steamer. Judgment is part of the job.
The Anatomy of a Professional Visit
Calls usually start with triage. A dispatcher asks where the leak is showing, how much snow sits on the roof, how thick the ice appears, and whether there are electrical hazards, such as low service lines near the eaves. They check if this is emergency ice dam removal, meaning active leaking or danger from falling ice, or a scheduled job where the risk is lower.
On site, the crew sets boundaries. They rope off the drop zones where ice and snow will come down, lay out plywood or tarps roof snow removal to shield landscaping and walkways, and verify ladder footing. On tall homes, a roof anchor or fall arrest system might be necessary. Simple steps, but they matter more than speed.
The next step is staging the steamer. Most units use a small engine and a fuel source that heats water to around 300 degrees Fahrenheit at the nozzle. The wand delivers a thin cut. It is not a pressure washer. The goal is to slice channels into the ice dam and release pooled water without blasting granules off shingles. Technicians work uphill, clearing paths for water to drain. Valleys and gutters are priority areas because that is where clogs form.
As ice loosens, slabs will slide. Good crews control how and where sections fall. They keep lookouts on the ground and stop work if someone wanders under the drop zone. If they need to move snow first, they push it gently with roof rakes from the rake edge, leaving a buffer of a few inches over the shingles to avoid scraping. Speeding through this stage is where damage happens. Slow, careful movement is faster in the end.
When the eaves and valleys are open and water runs freely, the immediate risk of leaks drops quickly. The crew then checks downspouts and ground drains, clearing any ice that could refreeze and back up. The most consistent improvement I see after a proper job is that indoor leaks stop within minutes of opening the first channels, and ceiling stains stop growing laterally. It feels like a release valve doing its job.
Steam vs. Other Methods
I get asked why steam ice dam removal costs more than other options. The short answer is that it is gentler on the roof and therefore reduces collateral repair costs. Heat cables can help prevent future dams, but they do not fix active leaks, and they can fail when you need them. Salts and de-icers work on concrete, not on asphalt shingles or aluminum gutters where they stain and corrode. Chisels and axes are simply wrong for roofing materials. Hot water from a hose loses temperature quickly and creates glare ice when the spray hits the ground.
There are edge cases. On metal roofs with exposed fasteners, a soft plastic mallet can sometimes knock icicles loose without harm, especially along snow guards. On slate or tile, even steam requires extra caution because freeze-thaw cycles can already have loosened pieces. If a roof is too fragile, sometimes the smarter move is interior mitigation first and exterior work after a warm-up.
If you are shopping for ice dam removal near me, listen for how a contractor talks about their tools. They should mention temperature control, low pressure, and protecting shingles. If the person on the phone talks mostly about how fast they can get a ladder up and start chopping, move on.
What Emergency Service Really Means
Emergency ice dam removal is about stopping active water intrusion and making the area safe. The price reflects the urgency, the after-hours risk, and the extra hands required to manage the site. In practice, that means a crew shows up with lights, marking tape, salt for walkways only, and a plan for managing the runoff. Expect them to ask where the breaker panel is and whether there are tripped circuits near the wet areas. They will likely want access to the attic hatch to check frost and hot spots.
From the customer side, the best help you can give before the crew arrives is simple. Move vehicles away from eaves and garage doors. Clear a path for equipment. Inside, contain water with towels and a drip pan, then puncture ceiling bubbles with a small hole to relieve pressure. Yes, poking a fresh hole sounds odd, but a controlled drip beats a panel bursting and dropping debris across a room.
The goal of emergency work is not to remove every ounce of ice in one visit. It is to open drainage and arrest the damage. If weather stays cold and more snow is coming, full removal might occur in stages. Crews often return after the next snowfall to keep the eaves open if the underlying insulation and ventilation are not yet corrected.
How Much Does Ice Dam Removal Cost
Prices vary by region, roof complexity, and timing. For professional ice dam removal with a steam unit, most homeowners see hourly rates in the range of 300 to 600 dollars per hour for a two-person crew, sometimes more for after-hours emergencies. A straightforward cape or ranch house with a 30 to 40 foot eave and a 2 to 3 inch dam might take 2 to 3 hours. A complex roof with multiple valleys, heavy snowpack, and thick ice can require 4 to 8 hours or multiple visits.
Always ask how the company bills. Some charge a minimum of two hours, then bill in increments. Clarify what travel time includes and whether they charge for de-icing gutters and downspouts separately. If someone quotes a flat per-foot price over the phone without seeing your roof or asking questions about access, be wary. Conditions change quickly with weather, and labor aligns to reality, not to a neat formula.
Insurance sometimes covers interior water damage, but rarely the cost of roof ice dam removal itself. Document the event with photos, save invoices, and keep records of communications. If a contractor damages shingles or gutters during the work, their liability insurance should address it, but you improve your odds by choosing a company with a track record and by walking the area with the crew leader before and after the job.
What Homeowners Can Do Immediately, Safely
While you wait for a professional, there are a few actions that reduce risk without adding new ones. First, if safe to do so from the ground, use a roof rake to pull down loose snow from the bottom 3 to 4 feet of the roof. Keep the rake flat and do not gouge. Work from the ground, not from a ladder on icy footing. Clearing that lower band reduces the fuel for the next melt and freeze cycle.
Second, manage indoor humidity. Bathroom fans that vent outdoors, kitchen range hoods, and a whole-house dehumidifier can lower moisture that otherwise condenses on the underside of the roof deck and adds to the problem. Keep attic hatches closed and weather stripped to limit warm air escape.
Third, move valuables out of harm’s way under suspect areas. That sounds obvious, but I have watched ruined pianos, dressers, and rugs being hauled to the curb after a preventable drip. Catch water, protect flooring with plastic sheeting, and map the pattern of stains so you can show the crew exactly where it is worst.
Why Ice Dams Happen in the First Place
Most homes that struggle with ice dams share a few traits. Heat leaks from living spaces into the attic through gaps around light fixtures, bath fan housings, plumbing vents, and unsealed top plates. Fiberglass batts sit loosely, leaving voids. Attic floors are partly insulated but full of penetrations that were never foamed or caulked. Meanwhile, attic ventilation is weak, with underpowered or blocked soffit vents and minimal ridge venting. The roof deck stays warmer than the outdoor air in the upper sections, which melts snow. The eaves stay cold. The cycle repeats.
Older homes with knee walls and short attic bays above second-floor ceilings are tricky. Warm air hides behind those walls, bypassing the attic entirely, and heats the roof from below. A well insulated, well ventilated roof behaves like the outdoors. It keeps snow cold and removal of ice dams checklist in place. The temperature differential across the roof slope stays small, so meltwater does not form a stream. That is the aim when we talk about preventing ice dams on roof structures.
The Preventive Work That Pays Off
Prevention breaks into three categories: reduce heat loss, move air properly, and manage melt at the eaves where possible. The first category, air sealing, delivers the best return. An energy audit that includes blower door testing and infrared imaging can reveal the largest leaks. Crews then seal penetrations with two-part foam, caulk, and proper covers over can lights. They install weatherstripping around attic access panels. After sealing, insulation upgrades matter more because you are not burying air leaks under fluff.
Next comes ventilation. Clear soffit vents so air can enter low and exit at the ridge. Use baffles to maintain an air channel where insulation meets the roof deck at the eaves. A continuous ridge vent coupled with open soffits moves air without spoiling the heat in winter. Avoid mixing multiple powered vents with passive systems that can short-circuit airflow. On complex roofs, a combination of additional intake vents and carefully placed outlets might be necessary, but do not cut holes or add fans without a plan.
Last is eave management. Heat cables can help on problem eaves and valleys. They are not a cure, but they can keep a predictable melt channel open during cold snaps. They work best when installed in a zigzag pattern triggered by a thermostat and a moisture sensor, not just a plug. They draw power, so treat them as a managed tool, not a permanent crutch. Properly sized and hung gutters matter as well. Oversized K-style gutters that stay clear and downspouts that discharge well away from the foundation prevent refreezing at the apron.
The Real Risk to Your Roof and Home
Water intrusion is the obvious problem, but a persistent ice dam does more than stain drywall. Repeated wetting and drying delaminates roof sheathing. Fasteners rust. Mold can grow in insulation that has wicked moisture. Paint blisters on fascia boards. Inside, light fixtures and electrical boxes exposed to drips can trip circuits or worse. The weight of ice and snow can pull gutters away from fascia boards, tearing out spikes and ferrules, leaving openings for wind-driven rain next spring.
If you see icicles the size of baseball bats hanging from one area on a relatively new roof, pay attention. It means either that area is losing heat or that the airflow at the eaves is blocked. I have seen soffit vents covered by insulation for years, suffocating the intake airflow. Restoring those channels changes winter behavior immediately. In contrast, applying calcium chloride socks on the ice dam might open a small path, but it will leave a streak of dead grass in the spring where it dripped and will not address the cause.
Residential Ice Dam Removal: What Differentiates a Good Crew
Residential work means minding details that commercial flat-roof crews don’t face as often. Landscaping, patio furniture, grills, cable lines, and children’s play areas sit directly under the eaves. A good team critiques their own drop zones and sometimes builds temporary chutes to guide falling ice. They will ask to move a grill or take down a satellite dish if it is in the fall line. If a contractor treats the property as an obstacle course to be ignored, they will not be careful on the shingles either.
Communication matters. The best teams narrate what they are doing without jargon. They explain why they are starting at a particular valley, tell you how long before they expect to see water flow, and give a heads-up before releasing a large chunk. They ask if anyone needs to enter or exit the home and stop when you do. It is the difference between a service and a transaction.
Choosing an Ice Dam Removal Service
Finding reliable ice dam removal near me during a cold snap is a bit like finding a plumber during a burst pipe. Demand is high, and the market fills with pop-up operations. Look for a company that owns its steam equipment, not one that rents daily as a side gig. Ask for proof of insurance and worker’s comp. Request references from prior seasons. Check whether they do off-season attic and insulation work or partner with weatherization pros, which suggests they understand the causes, not just the symptoms.
Avoid anyone who proposes climbing on the roof with chisels as their primary method. If they pitch chemical melting agents for the shingles, you can hang up. Clarify how they will protect landscaping and where they will direct meltwater. A little preparation saves you from a sheet of ice across your front steps the next morning.
A Short Homeowner’s Checklist Before and After Service
- Before the crew arrives, clear driveways and walkways, move vehicles out from under eaves, and mark any buried landscape features such as shrubs and gas meters. Inside, catch drips with pans and towels, and move valuables. After service, photograph the cleared eaves and valleys, monitor ceilings for new damp spots over 24 to 48 hours, and schedule a follow-up assessment for insulation and ventilation improvements.
A True-to-Life Example
A colonial I worked on last January had two dormers and a center valley that fed a gutter above the front porch. The homeowner called after a storm dropped 14 inches, followed by two days of sun and single-digit nights. Leaks showed up in the dining room and front hall. The gutter was frozen solid. We roped off the porch steps, laid down plywood to protect the boxwoods, and set the steamer at the right of the valley to open a runnel. The first cut took about 15 minutes, and water started flowing. We opened the entire valley over the next hour and cleared the front eave another 25 feet to both sides. Drips inside slowed, then stopped in the time it took to coil a hose. Total time on site was three hours.
Three weeks later, we returned to air seal can lights on the second floor, seal the attic hatch, add baffles at the eaves, and top up cellulose to R-49. The next snow sat evenly across the roof, with only small icicles on the south eave that disappeared by midday. The dining room ceiling dried out and needed paint, not drywall replacement. That is the arc you want: urgent fix, then durable change.
Regional Nuances That Matter
In the Upper Midwest, prolonged cold means ice dams can persist for weeks, and snow loads matter. Crews bring snow rakes and sometimes reduce the snowpack before steaming so the roof carries less weight. In coastal New England, frequent freeze-thaw cycles and nor’easters create thicker dams that regenerate quickly. Gutter and downspout design is more critical in those climate zones because of blowing snow. Mountain towns see large day-night swings and steep roofs that shed snow in slabs, which is both a blessing and a hazard. For those roofs, snow guards are part of the design, and steam removal focuses on valleys and transitions.
No matter the region, shaded north sides and sections under overhanging trees form dams earlier and hold them longer. If your problem area sits beneath a tall pine, pruning may help as much as any gadget.
What Not to Do
Skip roof salt pellets, table salt, and de-icing mixes on shingles. They stain, corrode metal, and kill plants, and the relief they offer is small and uneven. Do not use a pressure washer. It can drive water under shingles, strip granules, and leave you with a bigger leak in warmer weather. Do not chip or pry ice with metal tools. Even a careful hand leaves scars. Avoid ladders on icy ground unless you have a spotter and proper footing. Frozen gutters can release suddenly when pried, and the fall risk is real.
Finally, resist the idea that a brand-new roof is immune. I have seen two-month-old roofs leak because the attic below was a sieve of air leaks and the soffits were blocked. Roofing alone cannot overcome heat loss and poor ventilation.
The Long View: Designing Out the Problem
If you are renovating or building, you can make ice dams rare. Continuous exterior insulation that wraps the roof deck keeps the entire system closer to outdoor temperature, which stabilizes the snowpack and reduces melt. Synthetic underlayments with self-sealing properties provide a second line of defense. Properly sized overhangs, balanced ventilation, and careful flashing around dormers and valleys eliminate classic hot spots. It costs more up front, but it buys quiet winters and a long roof life.
For existing homes, the attainable sweet spot is a sealed and insulated attic, clear soffit-to-ridge airflow, and selective use of heat cables on stubborn edges. When that system is in place, professional roof ice dam removal becomes an occasional response to unusual storms, not a yearly ritual.
When to Call and What to Expect
If you see water stains spreading, hear dripping inside a wall, or notice doors swelling on the top floor in midwinter, call for professional ice dam removal sooner rather than later. The earlier the intervention, the shorter and cheaper the visit. Ask about scheduling, rates, equipment, and safety practices. Share photos if possible. Expect the crew to prioritize drainage, verify that water is moving to safe discharge points, and leave you with clear eaves and a list of preventive steps.
The same names tend to rise to the top each winter because they treat the problem with respect and method. They arrive with steam units tuned, hoses coiled, and a plan. They leave you with a roof that sheds meltwater and a home that stays dry, plus practical guidance to prevent a repeat.
Ice dams look stubborn, and they are if you fight them with the wrong tools. With the right approach, they yield fast. Clear the channels, stop the leak, then tighten the building so the problem fades into memory. That is the rhythm that works, season after season.